
A Foundational AWS Backend for Development: EC2, CloudFront & Terraform
Deploying a backend on AWS presents a common challenge: balancing reliability, security, and cost without getting overwhelmed by complexity. We needed a solution simple enough for our initial development phase but capable of evolving as our application grew. This led us to craft a foundational architecture using Amazon EC2, Docker Compose, CloudFront, AWS Certificate Manager (ACM), and crucially, Terraform for automation – a stack chosen to balance Infrastructure as Code (IaC) principles, security, and affordability for this first step.
Our primary goals for this initial setup were clear:
Automate Deployment: Use Terraform for repeatable, automated infrastructure provisioning.
Enforce Security: Ensure all user traffic flows securely over HTTPS via CloudFront and ACM certificates.
Control Access: Restrict direct HTTP access to the EC2 instance, allowing only traffic routed through CloudFront.
Optimize Delivery: Leverage CloudFront as a CDN for improved performance.
This blog post walks you through building this specific architecture – the first chapter in our infrastructure story. It's a setup designed for simplicity and cost-efficiency, making it well-suited for development environments or initial small-scale deployments.
Crucially, this setup is just the beginning. While effective for getting started, it has limitations we'll address later. In our next post, we’ll share how we scaled this foundation into a production-ready architecture using services like Amazon ECS, RDS, ECR, Application Load Balancer (ALB), CloudWatch, and Web Application Firewall (WAF). Join us as we explore the evolution of our AWS infrastructure, from this lean development setup to a robust production powerhouse.
Overview of the Architecture
The diagram below illustrates the target infrastructure we'll build using Terraform. Users connect via HTTPS to CloudFront, which securely routes traffic to the Dockerized application running on EC2 within our VPC.

All the Terraform configuration files (.tf), the example Dockerfile, and docker-compose.yml used throughout this guide are publicly available in our GitHub repository.
1. Setting Up Terraform (Provider & Backend)
First, we need to configure Terraform itself. We define the AWS provider and set up remote state management using an S3 backend. Storing state remotely is crucial for collaboration and preventing state loss.
provider.tf: Configures the AWS provider and required Terraform version.
# Configure the AWS Provider
# This specifies the AWS provider for Terraform and sets version constraints
terraform {
  required_providers {
    aws = {
      source  = "hashicorp/aws"
      version = ">=5.83.1" # Using at least version 5.83.1 for latest features
    }
  }

  # Set minimum required Terraform version
  required_version = ">= 1.10.3"
}

# Define the AWS provider configuration
provider "aws" {
  region = "ca-central-1" # Set deployment region to Canada Central
}

# Define an alias provider for resources required in us-east-1 (for ACM)
provider "aws" {
  alias  = "us-east-1"
  region = "us-east-1"
}backend.tf: Configures the S3 backend for storing Terraform state.
# Configure the Terraform backend
# This defines where and how the Terraform state is stored
terraform {
  backend "s3" {
    bucket = "terraform-tfstate-bytequest"     # S3 bucket for state storage
    key    = "bytequest/dev/terraform.tfstate" # Path within bucket
    region = "ca-central-1"                    # Region where the S3 bucket is located
    # encrypt        = true                              # Encrypt state file at rest
    # dynamodb_table = "terraform-lock-bytequest"        # DynamoDB table for state locking
  }
}
Run terraform init in your terminal within the project directory to initialize the backend and download the provider plugins.
2. Setting up the VPC
First, we'll establish an isolated network environment by creating a Virtual Private Cloud (VPC) along with its associated networking components. This forms the secure foundation upon which we'll build the rest of our infrastructure.
All network configurations, including the VPC and its associated resources, are defined within the network.tf file.
Step 1: Define VPC
The code below creates a VPC with a given CIDR range.
# -----------------------------------------------------
# VPC Configuration
# -----------------------------------------------------

resource "aws_vpc" "bytequest" {
  cidr_block           = "192.168.0.0/16" # Allocates the 192.168.0.0/16 IP range for our VPC
  enable_dns_hostnames = true             # Enables DNS hostnames within the VPC
  instance_tenancy     = "default"        # Uses shared tenancy for cost efficiency

  tags = {
    Name        = "bytequest-vpc"
    Created_By  = "terraform"
    Project     = "bytequest"
    Environment = "dev"
  }
}
Step 2: Create Subnets
Next, we create subnets in different availability zones:
# Create subnet in first availability zone (ca-central-1a)
resource "aws_subnet" "subnet_1" {
  vpc_id                  = aws_vpc.bytequest.id
  cidr_block              = "192.168.8.0/24" # Allocates 256 IP addresses (192.168.8.0 - 192.168.8.255)
  availability_zone       = "ca-central-1a"  # Deploys in first AZ for redundancy
  map_public_ip_on_launch = true             # Instances launched here receive public IPs by default

  tags = {
    Name        = "bytequest-subnet-1-192.168.8.0/24-ca-central-1a"
    Created_By  = "terraform"
    Project     = "bytequest"
    Environment = "dev"
  }
}

# Create subnet in second availability zone (ca-central-1b)
resource "aws_subnet" "subnet_2" {
  vpc_id                  = aws_vpc.bytequest.id
  cidr_block              = "192.168.11.0/24" # Allocates 256 IP addresses (192.168.11.0 - 192.168.11.255)
  availability_zone       = "ca-central-1b"   # Deploys in second AZ for high availability
  map_public_ip_on_launch = true              # Instances launched here receive public IPs by default

  tags = {
    Name        = "bytequest-subnet-2-192.168.11.0/24-ca-central-1b"
    Created_By  = "terraform"
    Project     = "bytequest"
    Environment = "dev"
  }
}
Step 3: Create internet gateway (IGW)
Now we create an Internet Gateway to allow traffic between our VPC and the public internet:
# -----------------------------------------------------
# Internet Gateway Configuration
# -----------------------------------------------------

# Create Internet Gateway for public internet access
resource "aws_internet_gateway" "bytequest_igw" {
  vpc_id = aws_vpc.bytequest.id

  tags = {
    Name        = "bytequest-igw"
    Created_By  = "terraform"
    Project     = "bytequest"
    Environment = "dev"
  }
}
Step 4: Configuring routing
Finally, we create a route table and associations to direct traffic properly:
# -----------------------------------------------------
# Routing Configuration
# -----------------------------------------------------

# Create route table with default route to Internet Gateway
resource "aws_route_table" "bytequest_rt" {
  vpc_id = aws_vpc.bytequest.id

  route {
    cidr_block = "0.0.0.0/0"                           # Default route (all traffic)
    gateway_id = aws_internet_gateway.bytequest_igw.id # Routes to internet via our IGW
  }

  tags = {
    Name        = "bytequest-internet-rt"
    Created_By  = "terraform"
    Project     = "bytequest"
    Environment = "dev"
  }
}

# Associate route table with first subnet
resource "aws_route_table_association" "subnet_1_association" {
  subnet_id      = aws_subnet.subnet_1.id
  route_table_id = aws_route_table.bytequest_rt.id
}

# Associate route table with second subnet
resource "aws_route_table_association" "subnet_2_association" {
  subnet_id      = aws_subnet.subnet_2.id
  route_table_id = aws_route_table.bytequest_rt.id
}
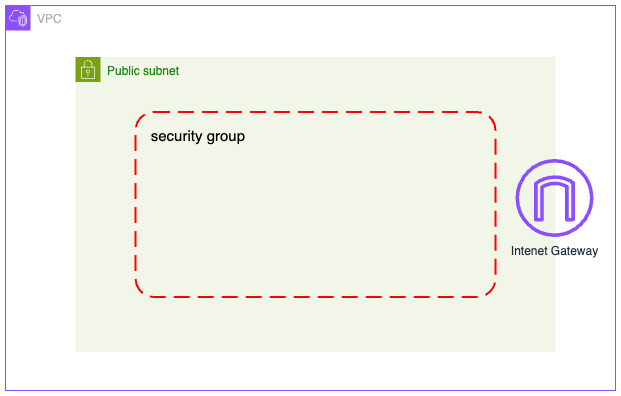
Step 5: Configuring security group
This security configuration ensures that all web traffic must flow through CloudFront, where we can apply additional security controls like SSL/TLS enforcement, WAF rules, and edge caching to improve both security and performance.
In our production environment, we further restrict SSH access and implement additional security controls like VPC Flow Logs for network monitoring and AWS Config for compliance verification.
# Reference the AWS-managed CloudFront IP range list
data "aws_ec2_managed_prefix_list" "cloudfront" {
  name = "com.amazonaws.global.cloudfront.origin-facing"
}

# Create security group with specific access rules
resource "aws_security_group" "bytequest_sg" {
  name        = "bytequest-sg"
  vpc_id      = aws_vpc.bytequest.id
  description = "Security controls allowing SSH from anywhere and HTTP only from CloudFront"

  # Allow SSH access from any IP address
  ingress {
    description = "SSH"
    from_port   = 22
    to_port     = 22
    protocol    = "tcp"
    cidr_blocks = ["0.0.0.0/0"] # Consider restricting to specific IPs in production
  }

  # Allow HTTP access ONLY from CloudFront IP ranges
  ingress {
    description     = "HTTP from CloudFront only"
    from_port       = 80
    to_port         = 80
    protocol        = "tcp"
    prefix_list_ids = [data.aws_ec2_managed_prefix_list.cloudfront.id] # CloudFront IP ranges
  }

  # Allow all outbound traffic
  egress {
    from_port   = 0
    to_port     = 0
    protocol    = "-1"          # All protocols
    cidr_blocks = ["0.0.0.0/0"] # Any destination
  }

  tags = {
    Name        = "bytequest-sg"
    Created_By  = "terraform"
    Project     = "bytequest"
    Environment = "dev"
  }
}
We've now completed the network configurations. This diagram illustrates the infrastructure we've built so far.
3. Setting up the EC2
In this step, we'll create the EC2 instance that will host our application. We'll use Ubuntu as our operating system and set it up with Docker to containerize our application components.
We selected a t3.micro instance because It's eligible for the AWS Free Tier, making it cost-effective for development
First, we need to find the latest Ubuntu image. Rather than hardcoding an AMI ID that might become outdated, we'll use Terraform's data sources to dynamically select the latest Ubuntu 22.04 LTS image:
# Find the latest Ubuntu 22.04 LTS AMI
data "aws_ami" "ubuntu" {
  most_recent = true

  filter {
    name   = "name"
    values = ["ubuntu/images/hvm-ssd/ubuntu-jammy-22.04-amd64-server-*"]
  }

  filter {
    name   = "virtualization-type"
    values = ["hvm"]  # Hardware Virtual Machine for better performance
  }

  filter {
    name   = "root-device-type"
    values = ["ebs"]  # Using EBS storage for persistence
  }

  # Canonical's AWS account ID (official Ubuntu images)
  owners = ["099720109477"]
}
Now we'll create our actual EC2 instance using the AMI we found:
# Deploy the EC2 instance
resource "aws_instance" "bytequest_ec2" {
  ami                    = data.aws_ami.ubuntu.id               # Use the latest Ubuntu AMI
  instance_type          = "t3.micro"                           # Free tier eligible
  key_name               = "ec2-root-key-pair"                  # SSH key for access
  vpc_security_group_ids = [aws_security_group.bytequest_sg.id] # Our security group
  subnet_id              = aws_subnet.subnet_1.id               # Deploy in first subnet

  # Configure the root volume with 20GB storage
  ebs_block_device {
    device_name = "/dev/sda1"
    volume_size = 20    # 20GB for OS, Docker images, and containers
    volume_type = "gp3" # General Purpose SSD for good balance of price and performance
    encrypted   = true  # Encrypt data at rest for security
  }

  # User data script to install Docker and Docker Compose
  user_data = <<-EOF
    #!/bin/bash
    # Update system packages
    apt-get update
    apt-get upgrade -y

    # Install Docker dependencies
    apt-get install -y \
        ca-certificates \
        curl \
        gnupg \
        lsb-release

    # Add Docker's official GPG key
    mkdir -p /etc/apt/keyrings
    curl -fsSL https://download.docker.com/linux/ubuntu/gpg | gpg --dearmor -o /etc/apt/keyrings/docker.gpg

    # Set up Docker repository
    echo \
      "deb [arch=$(dpkg --print-architecture) signed-by=/etc/apt/keyrings/docker.gpg] https://download.docker.com/linux/ubuntu \
      $(lsb_release -cs) stable" | tee /etc/apt/sources.list.d/docker.list > /dev/null

    # Install Docker Engine
    apt-get update
    apt-get install -y docker-ce docker-ce-cli containerd.io docker-compose-plugin

    # Enable and start Docker service
    systemctl enable docker
    systemctl start docker

    # Install Docker Compose v2
    mkdir -p /usr/local/lib/docker/cli-plugins
    curl -SL https://github.com/docker/compose/releases/download/v2.16.0/docker-compose-linux-x86_64 -o /usr/local/lib/docker/cli-plugins/docker-compose
    chmod +x /usr/local/lib/docker/cli-plugins/docker-compose

    # Create non-root user for Docker operations
    useradd -m -s /bin/bash appuser
    usermod -aG docker appuser
  EOF

  tags = {
    Name        = "bytequest-ec2"
    Created_By  = "terraform"
    Project     = "bytequest"
    Environment = "dev"
  }
}
We've now completed the ec2 configurations.
4. Setting up AWS Certificate Manager (ACM)
To secure traffic to our application, we use AWS Certificate Manager (ACM) to provision and manage an SSL/TLS certificate for our domain. This certificate will be used by CloudFront to enforce HTTPS for all user interactions.
We define the ACM certificate in the acm.tf file. The certificate is requested for our domain (e.g., example.com) and validated using DNS.
Important: ACM certificates used with CloudFront must be requested in the us-east-1 (N. Virginia) region, regardless of where your CloudFront distribution or origin is located. We use the aws.us-east-1 provider alias defined earlier for these resources.
Step 1: Get Hosted Zone Information
First, we need to retrieve information about our existing Route 53 hosted zone.
# Retrieve information about the Route 53 hosted zone for the domain
data "aws_route53_zone" "bytequest_domain" {
  provider     = aws.us-east-1 # Use us-east-1 provider
  name         = "bytequest.solutions"
  private_zone = false
}
Step 2: Provision the SSL/TLS Certificate
The certificate is requested for our domain (bytequest.solutions) and validated using DNS records automatically created in Route 53.
# Request an SSL/TLS certificate for the domain in us-east-1
resource "aws_acm_certificate" "bytequest_cert" {
  provider          = aws.us-east-1 # Use us-east-1 provider
  domain_name       = "bytequest.solutions"
  validation_method = "DNS"

  subject_alternative_names = [
    "*.bytequest.solutions" # Support subdomains (e.g., www.bytequest.solutions)
  ]

  tags = {
    Name        = "bytequest-cert"
    Created_By  = "terraform"
    Project     = "bytequest"
    Environment = "dev"
  }

  lifecycle {
    create_before_destroy = true # Ensure new certificate is created before old one is destroyed
  }
}
Step 3: Create DNS Validation Records
Terraform automatically generates the necessary DNS records (CNAME) within the specified Route 53 zone to prove domain ownership to ACM.
# Create DNS records in Route 53 for ACM certificate validation
resource "aws_route53_record" "bytequest_cert_validation" {
  provider = aws.us-east-1 # Use us-east-1 provider
  for_each = {
    for dvo in aws_acm_certificate.bytequest_cert.domain_validation_options : dvo.domain_name => {
      name   = dvo.resource_record_name
      record = dvo.resource_record_value
      type   = dvo.resource_record_type
    }
  }

  allow_overwrite = true # Allows Terraform to overwrite existing validation records if necessary
  name            = each.value.name
  records         = [each.value.record]
  ttl             = 60
  type            = each.value.type
  zone_id         = data.aws_route53_zone.bytequest_domain.zone_id
}
Step 4: Validate the Certificate
This resource tells Terraform to wait until AWS confirms that the DNS records have been propagated and the certificate is validated and issued.
# Validate the ACM certificate using the created DNS records
resource "aws_acm_certificate_validation" "bytequest_cert_validation" {
  provider                = aws.us-east-1 # Use us-east-1 provider
  certificate_arn         = aws_acm_certificate.bytequest_cert.arn
  validation_record_fqdns = [for record in aws_route53_record.bytequest_cert_validation : record.fqdn]
}
With these steps, Terraform requests the certificate, creates the necessary DNS records in Route 53, and waits for AWS to issue the certificate.
5. Setting up Amazon CloudFront
CloudFront serves as our CDN, caching content at edge locations to reduce latency and enforce HTTPS. It also restricts direct access to the EC2 instance by allowing only CloudFront-originated traffic, as configured in our Security Group.
Step 1: Define the CloudFront Distribution
We define the CloudFront distribution in the cloudfront.tf file. The distribution points to the EC2 instance's public DNS as the origin and uses the ACM certificate ARN obtained directly from the aws_acm_certificate resource defined earlier.
# Create the CloudFront distribution
# Create the CloudFront distribution
resource "aws_cloudfront_distribution" "bytequest_distribution" {
  enabled = true
  # The CNAME for accessing the distribution
  aliases = ["api-dev.bytequest.solutions"]
  # Default behavior for requests that don't match other cache behaviors
  default_cache_behavior {
    allowed_methods        = ["DELETE", "GET", "HEAD", "OPTIONS", "PATCH", "POST", "PUT"] # Allow all standard HTTP methods
    cached_methods         = ["GET", "HEAD"]                                              # Only cache GET and HEAD requests
    target_origin_id       = aws_instance.bytequest_ec2.public_dns                        # Route requests to our EC2 origin
    viewer_protocol_policy = "redirect-to-https"                                          # Redirect HTTP requests from users to HTTPS
    compress               = true                                                         # Enable automatic compression (e.g., gzip)

    # Using managed policies for simplicity. Customize or create your own for finer control.
    # Cache Policy: Controls caching behavior (TTL, cache keys)
    cache_policy_id = "4135ea2d-6df8-44a3-9df3-4b5a84be39ad" # Managed policy: CachingDisabled (Good for dynamic APIs)
    # Origin Request Policy: Controls what information is forwarded to the origin (headers, cookies, query strings)
    origin_request_policy_id = "216adef6-5c7f-47e4-b989-5492eafa07d3" # Managed policy: AllViewer (Forwards everything)
    # Response Headers Policy: Controls headers CloudFront adds to responses
    response_headers_policy_id = "67f7725c-6f97-4210-82d7-5512b31e9d03" # Managed policy: SecurityHeadersPolicy (Adds HSTS, XSS protection etc.)
    # Note: The original post used different policy IDs. These are common managed policies.
    # Ensure the policies used meet your specific caching and security needs.
  }

  # Restrictions (e.g., geographic restrictions)
  restrictions {
    geo_restriction {
      restriction_type = "none" # No geographic restrictions
    }
  }
  # Viewer certificate configuration (SSL/TLS for users)
  viewer_certificate {
    # Use the certificate ARN directly from the resource defined in acm.tf (us-east-1)
    acm_certificate_arn            = aws_acm_certificate.bytequest_cert.arn
    cloudfront_default_certificate = false
    ssl_support_method             = "sni-only"     # Use SNI for modern browser compatibility
    minimum_protocol_version       = "TLSv1.2_2021" # Enforce modern TLS version
  }

  # Use the public DNS of the EC2 instance as the origin ID and domain name
  # Note: Using public DNS means if the instance stops/starts, this needs updating.
  # A better approach involves Elastic IPs or Load Balancers (covered in future posts).
  origin {
    connection_attempts = 3
    connection_timeout  = 10
    domain_name         = aws_instance.bytequest_ec2.public_dns
    origin_id           = aws_instance.bytequest_ec2.public_dns # Unique identifier for the origin

    # Configuration for how CloudFront connects to the origin (EC2)
    custom_origin_config {
      http_port                = 80  # EC2 instance listens on port 80
      https_port               = 443 # Not used here as protocol is http-only
      origin_keepalive_timeout = 5
      origin_protocol_policy   = "http-only" # CloudFront connects to EC2 via HTTP (Security Group allows this)
      origin_ssl_protocols = [
        "TLSv1.2",
      ]
      # Connection timeouts
      origin_read_timeout = 30
    }
  }

  tags = {
    Name        = "bytequest-cloudfront-distribution"
    Created_By  = "terraform"
    Project     = "bytequest"
    Environment = "dev"
  }

  # Wait for the EC2 instance to be running and the ACM cert to be validated
  depends_on = [
    aws_instance.bytequest_ec2,
    aws_acm_certificate_validation.bytequest_cert_validation
  ]
}
6. Deploying and Running the Application
Now that the infrastructure is set up, we need to deploy the application to the EC2 instance. To do this, clone the project repository to the EC2 instance and run it using Docker Compose.
Step 1: Clone the Repository
SSH into your EC2 instance using the key pair specified in the Terraform configuration (ec2-root-key-pair). Then, clone the project repository:
git clone <your-repository-url>
cd <your-repository-directory>Note: If your repository is private, you may need to add an SSH key to the deployer key of your GitHub project to allow the EC2 instance to access it. To do this, generate an SSH key pair on the EC2 instance (ssh-keygen -t rsa), then add the public key to your GitHub repository under Settings > Deploy keys.
Step 2: Ensure the Dockerfile Exists
The application requires a Dockerfile to build the backend service. Ensure the following Dockerfile exists in the root of your project directory:
FROM python:3.13-bullseye

WORKDIR /app

# Install system dependencies
RUN apt-get update && apt-get install -y --no-install-recommends \
    build-essential \
    libpq-dev \
    && apt-get clean \
    && rm -rf /var/lib/apt/lists/*

# Copy requirements and install dependencies
COPY requirements.txt .
RUN pip install --no-cache-dir -r requirements.txt

# Copy the rest of the application
COPY . .

# Expose the port
EXPOSE 8000

# Start the application
CMD ["python", "run.py"]
This Dockerfile sets up a Python 3.13 environment, installs necessary system and Python dependencies, and starts the application using run.py.
Step 3: Run Docker Compose
Create a docker-compose.yml file in the project directory with the following configuration, or ensure it already exists in the cloned repository:
services:
  backend:
    build:
      context: ..
      dockerfile: Dockerfile
    ports:
      - "80:8000"
    depends_on:
      postgres:
        condition: service_healthy
    environment:
      - POSTGRES_USER=postgres
      - POSTGRES_PASSWORD=postgres
      - POSTGRES_HOST=postgres
      - POSTGRES_PORT=5432
      - POSTGRES_DB=test_db
      - ENVIRONMENT=development
      - LOG_LEVEL=DEBUG
      - DEBUG=True
    restart: unless-stopped

  postgres:
    image: postgres:17-bullseye
    environment:
      - POSTGRES_USER=postgres
      - POSTGRES_PASSWORD=postgres
      - POSTGRES_HOST=postgres
      - POSTGRES_DB=test_db
    volumes:
      - postgres_data:/var/lib/postgresql/data
    healthcheck:
      test: [ "CMD-SHELL", "pg_isready -U postgres" ]
      interval: 5s
      timeout: 5s
      retries: 5
    restart: unless-stopped

volumes:
  postgres_data:
Run the following command to start the application:
docker compose up -d
This command builds and starts the backend and PostgreSQL services in detached mode. The application should now be accessible via the CloudFront distribution URL (e.g., api-dev.bytequest.solutions)
Wrapping Up and Looking Ahead
While this architecture provides a straightforward and secure way to deploy a backend for development or simple use cases using familiar tools like EC2 and Docker Compose, it's important to recognize its limitations, especially as you scale towards production. This setup, while easy to understand and implement initially, faces challenges such as:
Single Point of Failure: Both the application and database run on a single EC2 instance. If this instance fails, the entire service goes down.
Scalability: Scaling requires manual intervention (e.g., choosing a larger instance type). There's no built-in auto-scaling.
Deployment Complexity: Updates require manually SSHing into the instance, pulling code, and restarting containers, which is prone to errors and downtime.
Database Management: Running the database within a Docker container on the same EC2 instance isn't ideal for production workloads regarding backups, patching, scaling, and high availability.
Monitoring & Logging: Basic monitoring is available, but more sophisticated application and infrastructure monitoring requires further setup.
In our upcoming blog post, we will address these shortcomings by evolving this infrastructure into a more robust, scalable, and automated production-ready architecture. We'll dive into leveraging managed services like Amazon Elastic Container Service (ECS) for container orchestration, Elastic Container Registry (ECR) for private Docker image storage, Relational Database Service (RDS) for a managed production database, Auto Scaling Groups (ASG) coupled with an Application Load Balancer (ALB) for high availability and automatic scaling, and CloudWatch for comprehensive monitoring and logging.
Stay tuned as we transform this simple setup into a powerhouse capable of handling demanding production traffic!